Showing posts with label Latin. Show all posts

Sunday, November 13, 2011

Sweet Potato Cakes with Black Bean and Corn Salsa


This recipe is quick and great for a party appetizer.  Since sweet potatoes are in season, I had a few on hand and thought I'd use em up.  You could totally make this a vegetarian meal by omitting the turkey bacon.  I love how cute this little appetizer is lol.

For the sweet potato cakes:
2 cups mashed sweet potatoes
2 eggs
1 cups flour
1/2 cup yellow cornmeal
1 tsp. baking powder
4 tbsp. butter
1 green onion stalk, sliced into thin rounds
1 pinch cumin
2 tsp. garlic powder
1 tsp. black pepper
salt to taste

Pre-heat your oven to 375 degrees/ Combine all of the dry ingredients in a bowl.  Next add the mashed sweet potato to a deep mixing bowl.  Next add in the eggs, butter and green onions.  Combine all of the wet ingredients, before adding in the dry ingredients.  Once all of the ingredients are in the same bowl, combine well, making sure to scrape the sides and bottom of the bowl.  Spray a cookie sheet with cooking spray and place a dollop of the mix onto the surface of the cookie sheet- it should look like the size of a lemon (in diameter).  Flatten them down a little with your spatula and bake for 25-30 minutes.

 For the salsa:
1 can black beans, drained
1 cup corn kernels, thawed
5 strips turkey bacon, diced
1/4 cup red onion finely diced
1 tomato cubed
1 stalk  green onion, plus more for garnish
3 garlic cloves, grated
1 tbsp. fresh lime juice
1/8 tsp. cumin
salt to taste

Add the corn, tomatoes, black beans, onions, garlic and green onions into a bowl. Cook the bacon in the oven at 400 degrees until it is crispy.  Slice the bacon into thin pieces and add to the bowl.  Next add in the lime juice, olive oil, black pepper, cumin and salt and combine every thing well.

For the garlicky sauce:
2 tbsp light mayo
2 tbsp. light sour cream
1 garlic clove grated
1 tsp. fresh lime juice
salt to taste

Combine all of the ingredients well.  Making sure to remove any lumps- you want a velvety smooth cream.

Assemble  by placing a sweet potato cake down on a serving dish. Next spoon a dollop of the sauce, followed by a scoop of the salsa.  Garnish with some sliced green onions.

Monday, July 25, 2011

Yuquita Frita (Fried Cassava)


I am embarrassed to say that I have only posted one recipe using yuca, and the fact that this blog is called the YUCA Diaries means I need to start adding more yuca recipes pronto!  So this is a simple yuca appetizer or side dish that is probably the counterpart to American French fries. I rarely fry food, but this is one of those occasions where I made an exception. These were served with a garlicky dipping sauce. Without further ado... here is the recipe.

Ingredients:
1 package frozen yuca
6 cups water
2 tsp salt
oil for frying (I use canola)

Add the water , 1 tsp. of salt and frozen yuca to a pressure cooker and cook on medium high for about half an hour or until the yuca is really tender. Dump the yuca into a colander to drain. Set aside to cool a bit.  You'll want to cut the yuca into strips similar to the size of steak fries.   Add oil to a non-stick pan and turn the heat up to medium high.  Once the oil is hot, add the yuca in and let it cook undisturbed until it's golden brown.  Transfer to a cooling rack and season with a little salt.

For the dipping sauce:
1 cup light mayo
1 bunch finely chopped Italian parsley or cilantro (whichever you're in the mood for.  I used parsley this time)
2 large garlic cloves, grated
2 tbsp. water
3 tbsp. fresh lime juice
1/8 tsp. soy sauce
salt to taste

First add the mayo to a mixing bowl. Next grate the garlic and chop the parsley and add it to the bow.  Mix well.  Finally add in the water, lime juice soy sauce, and salt and combine well. Enjoy!

Wednesday, July 13, 2011

Grilled Chicken according to Dana


If it weren't for the story attached to this post, I may not have considered this "blog worthy". You see, pollo a la plancha, or grilled chicken, is a very simple, almost no-brainer of a dish. It's basically a boneless, skinless chicken breast that is grilled with some onions, and is available in every Cuban restaurant in Miami. It's healthy and perfect for a weeknight meal. But this dish will forever hold a special place in my heart because of the following story.

When I was very young and growing up, I had a very very dear friend named Dana. Dana and I were inseparable, truly joined at the hip. Dana was, and still is one of the quirkiest people i've ever known. She is extremely funny, but the kind of funny that is so without trying to be. One of the best kinds of "funnies" in my opinion. Dana and I were together a lot, and it was not uncommon for her to come to dinner with my family and vice-versa. One day, we went to this very popular restaurant establishment called "Islas Canarias (Canary Islands) for dinner. The waiter comes around and introduces himself, brings the menus and says he'll be back to take the order shortly. So we're all looking at the menu and when the waiter comes around everyone starts placing their order. Finally the gentleman gets to Dana and asks, "and what can I get for you, young lady?" Without batting an eyelash, she blurts out "I'd like the "pajaro planchado please". Needless to say, this started a wave of hysterical laughter in the restaurant that only got louder and louder. I almost choked on my drink, my brothers were cracking up and the poor waiter (whom was an older, serious fellow) had to hold back tears of laughter. Dana was dying of embarrassment which made it all the funnier and the more we tried to stop laughing the harder it was. It was so funny- the kind of funny where your stomach hurts, you can't breathe, and you're wiping tears from your eyes. For those who don't speak Spanish, she had just referred to the grilled chicken breast as an "ironed bird" instead of "chicken on the grill"-and although it doesn't translate well into English, was one of the funniest things I'd ever heard. It was one of those "you had to be there moments" but suffice it to say that every time I have this dish it is "parajo planchado" and not "pollo a la plancha".

Ingredients:
4 boneless, skinless chicken breasts
1 lime
1 tsp. salt
1 small onion, cut into thin rounds
2 tsp. olive oil

The trick to making this dish really flavorful and juicy is to butterfly the breast, and then pound it out so that it's nice and thin. You also don't want to cook the chicken any longer than you have to, otherwise it can be as dry as the sole of your shoe. Since the chicken is very thin, it wont take long at all.  About 2-3 minutes on each side. Begin by seasoning the chicken breasts on both sides and setting aside.  In a large non-stick skillet or grill pan, add the olive oil and turn up to high heat.  When the pan get really really hot, add the chicken breasts and let them cook until they get nice and slightly golden.  Flip them over, squeeze a generous amount of lime juice over the chicken and finish cooking on the other side.  Transfer the chicken to a plate.   Next add the onions to the pan, season them with a little salt, and saute them for a few minutes, until they're nice and translucent and have sweetened.  Place a bed of onions on your serving plate and then place the chicken on top of the onions.  Serve with white rice and black beans, or a large green salad for a healthier option.

Monday, March 28, 2011

Shredded Chicken and Mayacoba Bean Enchiladas


I read an article recently about legumes that really inspired me to try some new beans.  I also realized that I've never made enchiladas.  I decided to make this dish not knowing how it'd turn out.  Thankfully they were delicious and even though they're enchiladas, I tried making them healthier than the traditional recipe by not frying and using reduced-fat ingredients.

 For the Beans:
1 package (16 oz.) dry Mayacoba beans (also known as Peruvian beans or Canary beans)
8 cups water
1 garlic clove, grated
2 tsp. salt

The first thing to do, is wash the beans to remove any twigs or debris.  Next transfer the beans to a pressure cooker with the water and salt.  Close the lid and turn up the heat to high.  Once the steam begins to come out of the pressure cooker, lower the heat to medium.  Let the beans cook for 30 minutes before turning off the heat.  I hate waiting for the pressure to release, so what I do is run cold water over the pressure cooker in the sink.  Remove the lid and check to make sure the beans are tender.  If not put the lid back on and cook for another 5-10 minutes, but they should be done within 30 minutes.  Using a slotted spoon, transfer the beans to a food processor bowl.  Add about 3 tbsp. of the bean water from the pot, a little salt and grate the garlic clove into the bowl.  Blend the beans until you have a smooth consistency.   Set aside until you're ready to assemble the enchiladas.

To make this dish a little easier, you could just mash the beans with a potato masher, but that will yield a more chunky consistency.   If you don't have a pressure cooker, you could soak the beans overnight and then just boil them in a pot with the same amount of water for about one hour.

For the Chicken:
5 boneless, skinless chicken breasts
2 medium onions, preferably white or yellow
1 green bell pepper
2 tbsp. minced green chili of your choice (like jalapeno or pasilla)- I omitted this because I didn't have any on hand, but for those of you who like it hot, go ahead and add these for some kick.
6 garlic cloves
1/2 tsp. cumin
2 tbsp.  olive oil
1/2 cup light sour cream
1/2 cup shredded Monterrey Jack cheese
Salt and pepper to taste

First boil the chicken breasts in a large pot of water.seasoned liberally with salt.  Once the chicken breasts are cooked through, transfer them to a cutting board and allow them to cool.   While the chicken is cooking, begin mincing your green pepper, garlic and green chilies.  Dice the onion finely and add the olive oil into a large non-stick skillet.  Turn the heat up to medium high and add in the chilies, onions and garlic to the pan.  Saute for about 6 minutes, stirring occasionally.  While the veggies cook, take two forks and begin shredding the chicken breasts.  Transfer the chicken to the skillet and season with the cumin, salt and pepper.  Allow the chicken and veggies to cook together for about 3-4 minutes before turning off the heat.  In a separate mixing bowl, combine the sour cream and cheese and add it into the skillet, making sure to combine everything really well.

For the enchilada sauce:
2 tbsp. butter
2 tbsp. flour
3 cups chicken stock
1 cup light sour cream
1/2 cup shredded Monterrey Jack cheese

First add the butter to a non-stick sauce pan.  Next add in the flour and make a roux.  To that, add the chicken stock and whisk vigorously, breaking any clumps of flour that may have formed.  Next add in the sour cream and the cheese and blend well.  Season with a little salt.  Set the sauce aside until assembling the enchiladas.

For the assembly:
8 flour tortillas
cooking spray or melted butter
1 cup shredded Monterrey jack cheese
1/2 cup fresh cilantro to garnish.

First pre-heat the oven to 400 degrees.  Next take a scoop of the beans and spread if evenly over one side of the tortilla.  Next add in a scoop of the chicken mixture and roll the tortillas.  Spray a 9x13 baking dish with a little cooking spray and place the enchiladas, seam down in the pan.  Repeat this step until you have filled the entire pan with the enchiladas.  Next spray the tops of the enchiladas with cooking spray, or brush with melted butter.   Place the baking dish in the oven and bake for 10 minutes or until the tortillas are slightly crisp.  Remove the tray from the oven and pour the sauce over the top of the enchiladas.  Next sprinkle the cheese over the top and place the pan back in the oven for another 10 minutes or until the cheese is golden and bubbly.  Garnish with some freshly chopped cilantro and serve.


Monday, February 28, 2011

Sweet Tamale Cakes


Have you ever been to a restaurant and ordered something you loved and thought to yourself, '"I bet I can make this at home"?  One of the dishes I've been meaning to try my hand at is the Sweet Corn Tamale Cake from Cheesecake Factory.  I finally got around to making these this weekend and thought they came out EXACTLY like the real thing.  This was probably the closest I've ever come to recreating a restaurant dish at home.  I looked online for a few recipes and modified one that I thought sounded like it would turn out well, and I was not let down.  All in all, it was a pretty simple dish, but a little tedious since you have to make three separate sauces.  Totally worth the effort in my opinion.

For the Tomatillo Salsa:
4 tomatillos, diced
2 tbsp. green bell pepper, minced
2 green onion stalks, minced
2 tablespoons fresh cilantro, minced
1  tsp. granulated sugar
1/4 teaspoon ground cumin
1/4 teaspoon salt

Chop up the tomatillo, pepper, green onion and cilantro.   Dump all of the ingredients into a food processor and gently pulse to get a smoother consistency.  Place the contents into a bowl and begin adding cumin, sugar and salt.   Stir well, cover with plastic wrap and place the bowl in the fridge to chill until you're ready to assemble the cakes.

For the Pico de Gallo:
2 medium tomatoes, diced
1 tbsp. minced Spanish onions
1 tbsp. fresh cilantro, minced
1 tsp. fresh lime juice
1 tbsp. green bell pepper or mild chili like pasilla, seeds removed and minced
1 tsp. salt
1 tsp. light olive oil

Dice up the tomatoes and add to a small bowl.  Mince the onions and peppers and add to the bowl.  Next, finely chop the cilantro and add to the bowl along with the rest of the ingredients.  Stir well, cover with plastic wrap and place in the fridge to cool until you're ready to assemble the dish.

For Southwestern Sauce:
1/2 cup mayonnaise (I used light)
2 tbsp. ketchup
1 tsp. white vinegar
1 tsp.water
1 tsp.  granulated sugar
1/2 tsp. chili powder
1 tsp. paprika
1/2 tsp. cayenne pepper
1 garlic clove, grated
1/2 tsp.  salt

Add the mayo, ketchup, water and vinegar to a bowl.  Whisk well to combine the sauces and remove any lumps.  Next add in the paprika, cayenne powder, chili powder, salt and garlic clove and whisk to combine all of the ingredients. Cover and put in the fridge to chill.

 For  the Cakes:
3 cups frozen sweet corn
1 1/2 sticks butter, melted
2 tbsp. water
6 tbsp. sugar
2 tsp. salt
1 cup corn flour (masa harina)
1/4 cup regular flour

Start out by pre-heating your oven to 400 degrees.  Thaw out  the corn kernels.  They don't have to be completely thawed, just tender enough to where they'll blend in the food processor.  Add the corn and the water to a food processor and pulse until you have a coarse chop.  Transfer the corn to a large mixing bowl and add in the butter.  Blend well with a spatula.  Next add in the corn flour and the regular flour, the salt and sugar and blend well.  You should have a sticky consistency.  If it feels too dry, add a little water.  Spray a non-stick cookie sheet with cooking spray and begin forming the cakes.  You should have a  shape similar to a crab cake.  Place the cakes down on the cookie sheet.  Bake for 15 minutes and remove the tray from the oven to flip the cakes.  Bake for another 10-15 minutes.

For the Garnish:
1 hass avocado
6 tbsp. sour cream
3 tbsp. finely chopped cilantro


To Assemble:
Spoon the tomatillo salsa along the bottom of your serving platter.  Place the cakes over the tomatillo salsa and then top with the pico de gallo.  Next drizzle a little of the southwestern sauce over the top of the cake.  Cut the avocado into small chunks and place on top of the cakes.  Dollop one tbsp. over each of the cakes and sprinkle the top with some fresh chopped cilantro.


Sunday, February 13, 2011

Paella


This is my first attempt at Paella. As I've mentioned before, B. and I follow kosher laws so it's not your traditional Paella.  Traditional Paella has shrimp, fish, mussels, clams, and any other seafood you'd like to add. There are also other varieties that include chicken and even chorizo.  I decided on sticking to a simple fish paella for my first attempt, but if you're feeling more daring, go ahead and add any protein you'd like.  You could also make it a vegetarian Paella if you're not into meat by adding lots of fresh veggies like asparagus and artichokes.

Ingredients:
2 onions, medium
6-8 cloves garlic
1 red pepper
1 green pepper
2 bay leaves
4 tbsp. extra virgin olive oil
3 cups Valencia rice
3 cups chicken stock
1/2 cup dry white wine
1 tsp. crush saffron threads
1 1/2 lbs. cod
1 cup frozen peas
1/2 tbsp. salt
2 tbsp.  fresh chopped parsley for garnishing
1 lemon cut into wedges for squeezing at the end
red pepper flakes for sprinkling at the end, optional

First finely dice the onion and green pepper and grate the garlic cloves.  Add three tbsp. of olive oil to a non-stick pan with a lid and turn the heat to medium high.  While the oil heats, cut the red pepper into slivers.  Add the onions, garlic, peppers and bay leaf to the oil, reserving about half of the red peppers for later.   Stir everything around and cook bring down the heat to medium.  Cook for about 5 minutes and then transfer to a holding plate.  Wash the rice really well, until the water runs clear and drain it well.  Cut the fish into large chunks and set aside.Turn the heat up to medium high and add the rice into the pan.  Saute, making sure to evenly and lightly toast the rice.  Turn the heat to high,   and add in the onions, garlic, and peppers that were in the holding plate and combine well.  Next add in the chicken stock, wine,  and the saffron threads.  Stir everything around and let everything cook until about half of the liquid has evaporated.  Now add the fish gently into the pan, along with the rest of the red peppers and the peas. Cover the pot with a lid and turn the heat to low.  Let everything cook undisturbed for about 15 minutes.  Let the Paella sit with the heat off  and the lid on for an additional 5 minutes before serving.

When serving, plate the paella into a dish and add a little freshly chopped parsley to the top.  Also, squeeze a little lemon juice and drizzle with a little bit of olive oil.  For those who like it hot, sprinkle a few crushed red pepper flakes.  Voila.... or should I say Ole?

Saturday, January 29, 2011

Baja Fish Tacos


This was sooooo good. I can't even think of a proper introduction, other than telling you that you should really go make these.  Serve with an ice cold corona and lime and you'll forget it's the middle of winter.  It's summer somewhere no?

For the fish:
2 lbs firm white fish like grouper ( I used a mix of grouper and cod)
1 cup all purpose flour
1/2 cup cornmeal
1 bottle of light beer (I used Corona)
1 lime
salt and pepper to taste
canola oil for frying

If you're using frozen fish, thaw it out and take a paper towel to dab off the excess water.  Cut the fish into cubes and season with a little lime juice, salt and pepper.   In a separate bowl, add the dry ingredients.  Dust the fish  in the dry ingredients first to create a coat that the batter will adhere to.  Once the fish is lightly coated with flour set aside.  Add the beer into the dry ingredients along with a little salt and whisk well.  Add the canola oil to a non-stick skillet and turn the heat to medium high. Once the oil is hot, begin dunking the chunks of fish into the batter and transfer to the oil.  Fry until one side is golden brown and then flip.  Transfer the cooked pieces of fish to a plate lined with paper towel.  Repeat until all of the fish is cooked.

For the cabbage pico de gallo slaw:
1/2 cup red cabbage
1/2 cup white cabbage
2 whole tomatoes
1 garlic clove
2 limes (juice and zest)
1/2 cup fresh chopped cilantro
Finely shred the cabbage and transfer to a bowl.  Zest the lime into the bowl and then squeeze the juice into the bowl.  Grate the garlic and add to the bowl.  Wash the tomatoes well and chop into chunks, removing the seeds first.   Lastly chop up the cilantro and add to the bowl, season the slaw with salt and  make sure to combine all of the ingredients well.

For the spicy sauce:
1/2 cup low-fat mayo
1/4 cup low fat sour cream
2 tbsp. hot sauce (like tabasco)
1 tsp. cayenne pepper
1 tbsp. lime juice
1 garlic clove, grated
salt to taste

Combine all of the ingredients in a bowl, whisking well until no lumps are visible.  You can add more or less hot sauce depending on how spicy you like it.

Assembling the tacos and extra ingredients:
2 corn tortillas (two should be enough per person, but for those with a hefty appetite, you may need three)
1 liberal spoonful of the pico de gallo slaw
3 pieces fish
1 tbsp. spicy sauce
1 tbsp. crumbled feta cheese

To assemble the tacos, warm up the tortillas in the microwave for 20 seconds.  Next place three pieces of fish on each tortilla and spoon some of the pico de gallo slaw over the fish.  Spread a little of the spicy sauce and top with some crumbled feta.  Serve with some sliced avocado, a few lime wedges and an ice-cold corona.

Enjoy!


Monday, January 3, 2011

Muñeta: A Look at an Obscure Cuban Dish


Munyeta is a dish my grandmother on my father's side used to make when I was a kid.  My grandmother was from a rural town in Cuba named Camaguey where this dish was popular. It's more of an obscure dish, since most people I asked about  it had no clue what I was talking about. It had been years since i'd had it and all of a sudden I remembered it with nostalgia.  Basically, it's a white bean cake that kind of looks like a Spanish tortilla by the time you're done.  It's really easy to make- using only 6 ingredients and the flavors work so well together.

Ingredients:
1 bag navy beans (if you're really in a rush you can use the canned variety, but it tastes way better using the dry beans)
1 large onion, roughly diced
8 garlic cloves
1 tbsp. smoked Spanish Paprika
1 cup cubed ham and bacon (I used turkey bacon since I follow Kosher laws)
5 tbsp. extra virgin olive oil
Salt to taste (go easy on this because the bacon also adds salt)

First wash the beans well, removing any little pebbles or twigs.  Add to a pressure cooker with 6 cups of water and cook until the beans are soft and tender.  If  you don't have a pressure cooker, soak the beans overnight and then cook them in a regular pot.  Once the beans are cooked, put them in a colander to drain the liquid.   Next use the back of your knife to smash half of the garlic cloves.  Add a little olive oil to your pan and toss the garlic in to infuse the oil.  Cook until the garlic is tender and becomes sweet.  Remove and set aside.  Next dice your onion and add to the pan, sauteing for about 6 minutes.  While the onions cook, dice the ham and bacon into small cubes.  Transfer to the pan and cook until the bacon and ham become slightly crispy.  Next add the beans and the paprika.  Begin to mash the beans with a potato masher or the back of a large spoon until you have a coarse paste.  Don't worry about getting it perfectly smooth, you'll want a rustic consistency.  Add two tablespoons of olive oil and blend everything well.  Taste for salt.   The trick to this dish is letting it cook until the bottom of the mix gets browned and slightly crunchy.  Then use a spatula to mix it up, allowing the new layer to get crunchy before mixing again.  Add more olive oil as needed.  You'll notice that as you continue to cook the munyeta, it will become really pliable and you'll be able to shape it into a large cake reminiscent of a Spanish tortilla.   Transfer to a plate, drizzle with a little olive oil and garnish with some fresh chopped parsley.

I know this may sound weird, but I didn't feel like eating this with rice, so I fried up a few eggs- over easy and squeezed some ketchup on the side.

Here are the step-by-step action shots...


Wednesday, December 15, 2010

Caldo Gallego


This post is dedicated to all my fellow Miamians. This week the temperature dropped to record lows and people have been freezing their butts off. All over facebook, the statuses are about how cold it is, how many layers people are wearing and how people from Miami are not made to deal with such cold temperatures. And truthfully, I don't blame them; yesterday with the wind chill factor it was in the 20's. So this post is dedicated to my Miami brethren. This Spanish bean soup is the perfect thing to warm your bones and fill your tummy.

Ingredients:
1 package dry navy beans
1 yellow onion, finely diced
4 garlic cloves, minced
1 large carrot, peeled and finely diced
2 celery stalks, finely diced
3 small potatoes
1 turnip
1 head of kale (you can substitute with collard greens or Swiss chard)
2 sprigs fresh thyme
6 slices bacon ( I used turkey bacon because I follow kosher laws)
1 lb. flank steak
6 cups water
3 tbsp. olive oil (plus more for garnish at the end)
salt to taste

The first thing to do is rinse the beans and make sure there are no little pebbles or twigs in the package and set aside. Next finely dice the onions, garlic, celery, carrots as well as the bacon (save one garlic clove to add in at the end). Make sure to cut the slices into small pieces. The traditional Caldo Gallego calls for ham hock and or chorizo or some kind of sausage, but I omitted these ingredients. Add the olive oil to a pressure cooker and toss the vegetables you just chopped and the bacon and saute until the bacon is nice an crunchy and the veggies are tender. Now would be a good time to trim the flank steak of any excess fat and cut it into large pieces. Add the beans, water and thyme, and flank steak to the pressure cooker, giving everything a good stir before putting the lid on. Let the beans cook on medium-high heat for about 30 minutes before checking on it again.

While that is cooking, begin peeling the potatoes and turnips and cubing. Next wash the kale well and roughly chop. After the beans have cooked for about half an hour, remove the pot from the stove and run under cold water to release the pressure. You could also just turn off the burner and let it cool enough for the pressure to be released from the pot on it's own. Taste the beans to see if they're tender, as well as the saltiness of the soup. Add a little salt if necessary. The beans should be about two-thirds of the way cooked at this point. Stir everything in the pot, and then add the potatoes, turnip and kale and stir well. Put the lid back on and cook for about 20 minutes on medium-high heat. After the time is up, release the pressure from the pot before removing the lid and taste once again. Make sure the the beans are tender and that it doesn't need any more salt. Grate the last garlic clove into the soup and stir really well. Once the beans, potatoes, and turnips are tender the soup is done. Serve with rice or crusty bread and drizzle the top of the soup with just a little bit of olive oil before serving.

Let the defrosting begin!

Saturday, December 11, 2010

Lomo Saltado


Lomo Saltado is a popular Peruvian dish.  I had it many many years ago one day on my lunch break at this little Peruvian restaurant in Miami and instantly loved it. People often refer to it as a Peruvian stir-fry.  I made it tonight for dinner and wondered why I had waited so long to make it again.  It's pretty simple, and really really tasty. Plus you probably have many of these ingredients in your kitchen already.

Ingredients:
1 lbs.  flank steak
3 small or 2 large potatoes
1 large onion
2 small tomatoes
1 red bell pepper
1 green bell pepper
1 orange or yellow bell pepper
4 cloves garlic
2 limes
1/4 cup dry white wine
1 tbsp. ketchup
1/3 cup fresh chopped parsley
1/4 cup soy sauce
3 tbsp olive oil (two for stir frying and one to bake the potatoes)
Salt and pepper to taste

First turn up your oven to 450 degrees.  Peel the potatoes and cut them into strips like if you were making french fries.  Essentially that's exactly what you're doing.  Line a cookie sheet with a silicone mat or parchment paper.  Add one tbsp. of the olive oil to the pan, add the potatoes, and coat the potatoes with oil- just enough to lightly coat- one tbsp. should be more than enough. Put the cookie sheet in the oven and cook the fries until they're nice and golden brown.  While the potatoes cook, slice up the flank steak into thin strips, cutting against the grain.  Add a little olive oil to a deep pan, turn the heat to high and begin sauteing the beef once the pan is really really hot. Don't add any salt yet because you will add soy sauce later and the dish may be too salty if you do both.  You'll also want to add the meat in small batches so that you don't overcrowd the pan and get a braising effect- we're going for a nice sear for this dish. Once you cook the beef through, transfer it to a holding plate (with any juices) and set aside.  Now begin dicing your onion, peppers, and tomatoes into long thin strips. Grate your garlic at this time too.  Add a little olive oil to the pan and then transfer the peppers, tomatoes, onions and garlic to the pan and saute on high heat.

Once the veggies are tender, add the beef (and any juices) back into the pan, mixing it well with the veggies.  In a separate bowl combine the white wine, ketchup, lime juice and soy sauce.  I know it sounds weird, but it works...  just trust me on this one.  Add the sauce to the pan and combine it well.  Now would be a good time to taste for salt.  Add a little salt if necessary.  Add the parsley to the pan reserving about 1 tbsp. for the garnish at the end. The potatoes should be done by now.  You'll want them to be nice and golden brown before transferring them to the pan.  Once ready toss the potatoes into the pan, mixing gently as to not crush the potatoes.  Serve with white rice and garnish with fresh chopped parsley.


Monday, November 29, 2010

Alfajores


Alfajores are the most delicious little cookies.  They're two subtly sweet cookies which have dulce de leche in between and then topped with powdered sugar.  If you've never had an alfajor, you must try them- you won't regret it, or maybe you will after cookie #9- lol.  My personal preference is to make a thin cookie so that you have a nice crunch when you bite into them, coupled with the smooth texture of the dulce de leche... bliss, total and utter bliss.   So here's my recipe:


Ingredients:
1 1/2 cup sugar
1 cup butter
2 eggs
1 cup milk
1 tsp. vanilla extract
3 1/2 cups flour
1 cup cornstarch
1 tsp. salt
2 tsp. baking powder
1/3 cup powdered sugar
1 can condensed milk

First, preheat the oven to 350 degrees. Cream the butter and sugar together on high speed until the mixture is light and fluffy and has turned about two shades paler.  Next crack in the the eggs, add the vanilla, and blend well for about 2 minutes on high speed. Once blended well, add the milk and blend once again.  In a separate bowl combine the flour, salt, cornstarch and baking powder and then add to the wet mixture in thirds, blending evenly each time.  Make sure to scrape the sides of the bowl every now and again. You should have a semi firm dough.  Sprinkle a little flour onto your work surface and begin gently kneading the dough, adding more flour as needed to prevent it from sticking.  Cut a piece about the size of your palm and begin gently rolling out the dough.  I like the alfajores to have really thin cookies so I rolled the dough out quite a bit to achieve this. Using cookie cutter, begin cutting your shapes. I put a silicone mat on my cookie sheet and then transferred the cut-out shapes to the sheet.  Put the pan in the oven and let the cookies bake for about 10-12 minutes. Once baked, remove the cookies from the tray and let them cool completley.

For the dulce de leche- all you'll have to do is cook the can of condensed milk in water.  I added water to my crock pot (about 6 cups) and put the can into the water. Just let it cook on the high setting for about 3 hours.  You could also do the same thing in a pressure cooker for about one hour.  Just a warning though, let the can cool a bit before opening it, otherwise the heat will expel the contents out like a volcano and you'll have dulce de leche everywhere.  I learned the hard way!

To assemble, add a little dollop of dulce de leche on one side of the cookie and top it with another.  Sprinkle the top of the cookies with powdered sugar.


P.S.  There is no easy way to eat this... they're messy and gooey and you'll have stuff all over your hands, but it's so worth it!

Saturday, October 30, 2010

Croquetas


Croquetas originated from Spain and are often served as part of a tapas menu.  Although I never knew that, I always just assumed they were Cuban. Partially because they're available at every Cuban bakery in Miami.  They're the quintessential snack food that seemed to always be present at parties, get-togethers, and Sunday breakfasts.  My brother inspired this post.  He said it best with his twitter update of a few weeks ago. "Nothing cures a hang-over like a croqueta preparada". What is a croqueta preparada you say?  It's a sandwich made with Cuban bread (much like French bread, only not as crusty, more on the soft side) two croquetas, (ham and cheese- but I skip this part) and ketchup.  Some add onions or even lime juice. Wash that baby down with a Jupiña and you'll be good to go till dinner time.  The most common variety of croquetas are the ones made of ham (I used turkey ham for these since I follow Kosher laws), but really any ground up protein will work.  When I was little, my family used to make croquetas out of the leftover turkey at thanksgiving.  The croqueta made of chicken are probably the next most common version.  I've seen them made of cod, spinach, all sorts of things- really the sky's the limit.  So go on... make one. You'll be glad you did.

Ingredients:
5 tbsp. butter
1 cup flour
1 1/2 cups whole milk
1/2 cup chicken stock
2 tbsp. dry white wine
1/3 cup onion very finely diced
2 cups ground up ham (I used turkey ham)
1 tsp. ground nutmeg
1 tsp. salt
canola oil for frying

For the breading:
2 eggs
2 cups plain bread crumbs


 First thing to do is add the butter to a non-stick pan.


Let it melt and then add the flour.  With a silicone whisk or spatula, begin combining the flour and butter.
Let it cook a little bit on medium heat so that the raw flour taste cooks out.  Finely dice your onion and toss it into the pan to cook with the flour and butter mixture.


Next add the milk and chicken stock and begin whisking vigorously to incorporate the flour well into the milk. Add the wine at this point. Make sure to dissolve any clumps- and turn the heat down to medium low.
Add the ground nutmeg and salt and combine well.  The sauce will thicken considerably.  But that's the way it's supposed to be for this  particular dish.


Turn the heat off at this point. Chop up the ham into cubes and toss into the food processor.  Run the processor for about 30 seconds.


Now add the ham to the bechamel sauce, making sure to incorporate well.Make sure you let this mixture cool completely before moving on to the breading.  I transferred this mixture to a pan and put it in the fridge for about 30 minutes.


Once you can touch the mixture without burning yourself, begin forming the croquetas and then passing them through the egg and bread crumb mix.  You'll want to repeat the process twice for each croqueta.  Transfer to a plate and let them just hang out there.


 Put the canola oil into a non-stick pan and turn the heat up to medium.  Once the oil is hot, transfer the croquetas to the pan.  Making sure to turn them on every side to make sure you get a nice even golden color throughout.


Serve with some ketchup.  If you've had a long night and want a "stick to your ribs" meal, slap two croquetas in between some Cuban or French bread, squeeze some ketchup and enjoy the "croqueta preparada".


Thursday, October 21, 2010

Pulpeta: The Cuban Meatloaf


Growing up, this dish was not made too frequently because my brother, Ozzy, was a really picky eater.  Unfortunately, this meant my mom would not make dishes that he didn't like too often.  This was one of those dishes.  Now, he's grown up and his palette has changed thankfully.  One day I was making this for dinner and he showed up.  He raised the lid of the pot and said "Oh you're making Brain for dinner"  He calls this dish "brain" because the center is stuffed with cheese and as the meatloaf cooks in the sauce the cheese oozes out. Don't let that bizarre introduction turn you off.  This dish is absolutely delicious- and it's one of those more obscure Cuban dishes that is definitely worth sharing. I think it my duty to preserve these family recipes so that we can continue to pass them down throughout the generations. Oh yeah and did I mention that it's delicious?

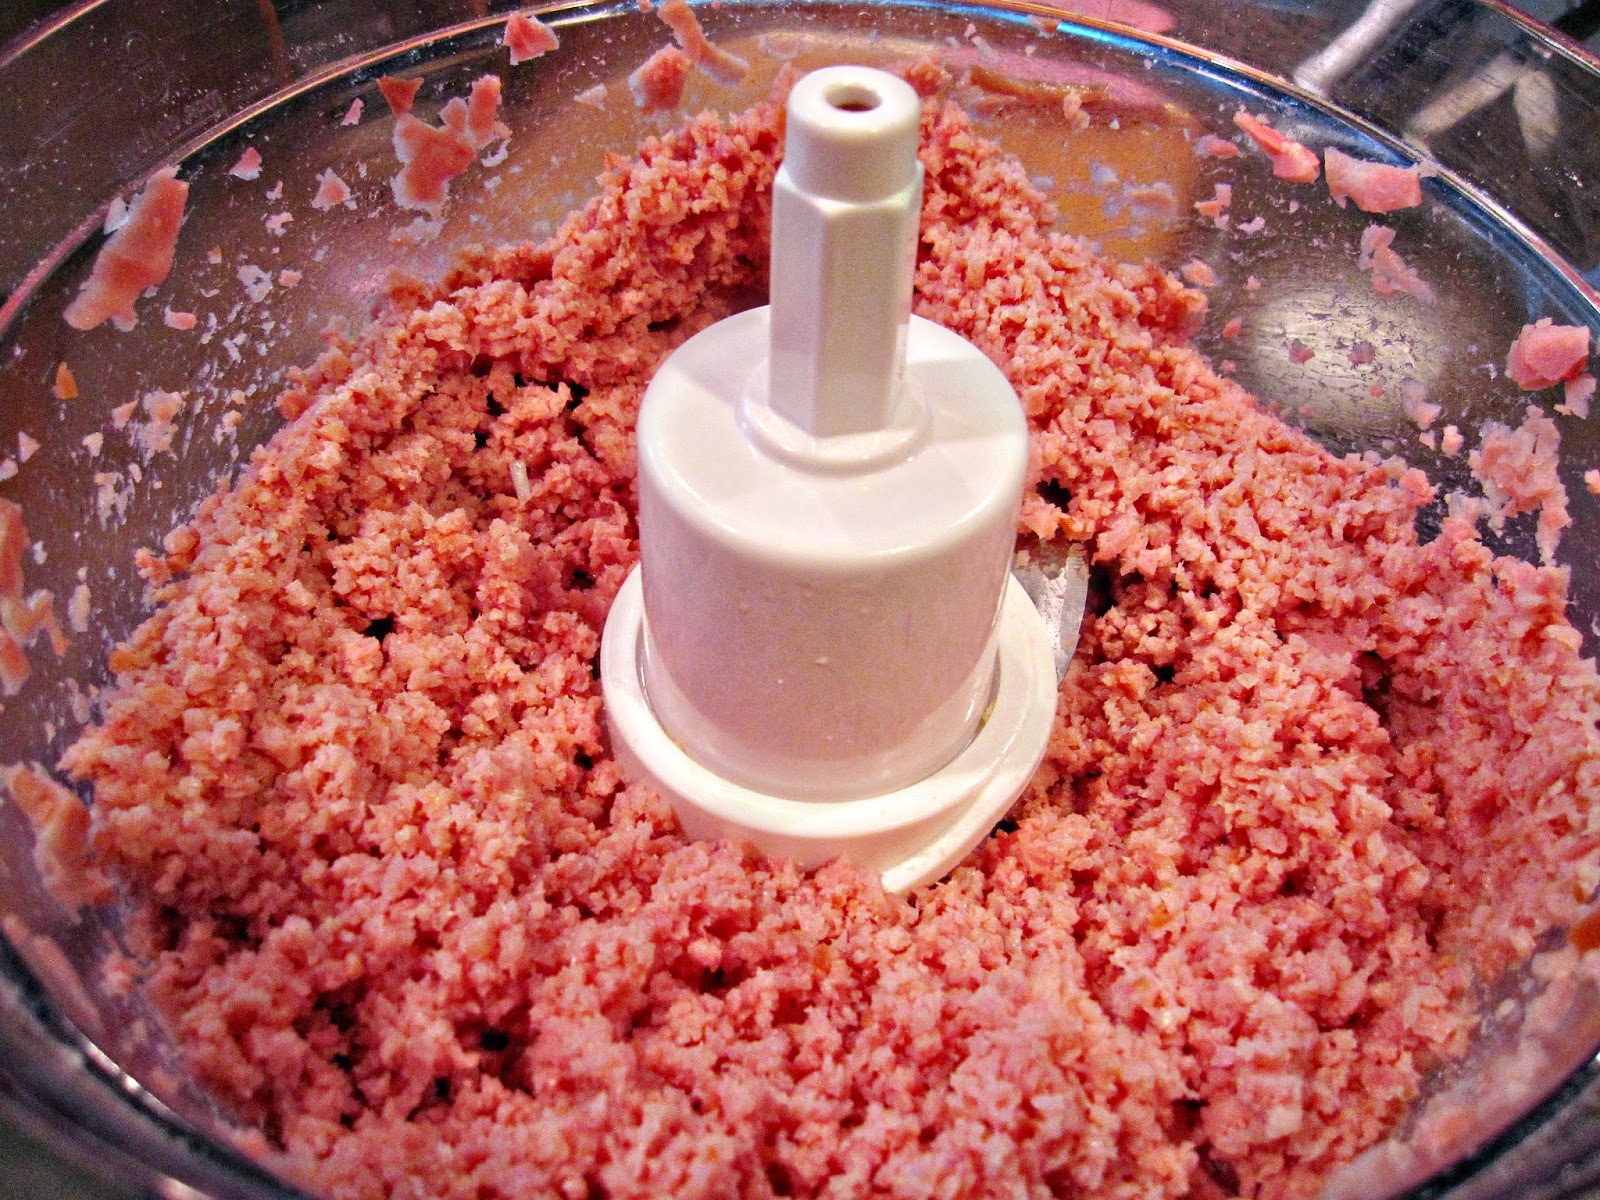
Side note- This recipe calls for ground beef.  Lately I have been using the food processes to grind up my own meats.  It gives me a little peace of mind to know that there's no "mystery meat" or fillers in the meat I'm using.  I had no idea that the food processor could do this until recently and it's my new favorite kitchen trick.


Ingredients:
3 lbs. Ground Beef (I ground up my own, using brisket)
4 eggs (two for the meatloaf mixture, and two for the breading station)
2 cups plain breadcrumbs or cracker meal (1/2 cup for meatloaf mixture, and 1 1/2 cups for the breading station)
8 mozzarella string cheese sticks (four per loaf)
2 large onions
1 green pepper
6 cloves garlic
3 tbsp. extra virgin olive oil
1/2 cup canola oil
2 small cans tomato sauce
1 can petite diced tomatoes
2 tbsp. ketchup
2 1/2 cups dry white wine
1 tbsp. garlic powder
1 bay leaf
salt to taste

My first step was grinding up the beef in the food processor. You'll skip this step obviously if you're using beef that's already ground.  Another advantage to using the food processor is that after you're done grinding the meat, you can just add all of the seasoning and blend instead of having to use your hands and a separate bowl.  This is a shortcut, and it's the first time I've done it this way though.  I added the two eggs, salt, garlic powder, and 1/2 cup of bread crumbs to the food processor and blended everything.  If you're not using a food pro, then just mix everything in a bowl.  Next remove the beef mixture and transfer to a cutting board.  Press the meat down like if you're making a massive hamburger and then add four pieces of string cheese in the center of the patty.  Fold the sides and ends over to create a large loaf.   Make sure to seal the sides well so that the cheese doesn't all ooze out during the cooking process.  You will have some cook out, but that's just part of the beauty of this dish.  Who doesn't like cheese oozing out into sauce??


Next create the breading station for the loaves (as shown above). I made two,  loaves.  This is a great meal to keep for leftovers.  You can make pulpeta subs the next day if you want to change it up a bit- its sort of like a meatball sub. Ok, back to the pulpeta, begin breading the loaves.

Next, we'll brown the loaves.  Add the canola oil to a deep pot with a lid- preferably non-stick. Make sure to turn the loaf on all sides to brown evenly.

Transfer the loaves to a cutting board for now so that we can begin on the sauce.

Discard the canola oil we used to brown the pulpeta.  Add the olive oil to the pan and turn up to medium heat.  Begin chopping the onion, green pepper and garlic and add to the pan to begin sauteing.

Allow the onions, peppers and garlic to cook for about 10 minutes. Next add the tomato sauce, diced tomatoes, ketchup, wine and bay leaf.  I know ketchup sounds weird huh? But I find that whenever I make any tomato based stew or sauce adding a little ketchup balances out the flavors and adds a really slight sweet touch to the sauce.

Allow the sauce to simmer for about 5 minutes before putting the loaves back into the pan.

Cover with a lid and allow the pulpeta to cook for about 40 minutes on medium low heat. When you remove that lid you'll find that the sauce has thickened beautifully, the cheese has begun to  ooze.  This is a thing of beauty my friends... you'll just have to trust me on this.

The next thing you'll do is ever so gently, remove one of the loaves to a cutting board and cut into slices.  Then transfer the pulpeta back into the pan so it doesn't dry out.

Serve a slice with lots of yummy sauce and white rice.

Thursday, September 2, 2010

Tres Leches


Tres Leches is a traditional Latin dessert that consists of a light spongy cake that is soaked in a mixture of three milks and topped with whipped cream.  I know it is super fattening, but I am hormonal today... don't judge me! This will yield about 10 servings.... so make it when you know you'll have company; otherwise you'll be visiting the fridge at all ungodly hours of the night!

For the cake:
1 cup all purpose flour
1 1/2 tsp. baking powder
1/2 tsp. salt
1 cup sugar
1/2 stick butter
5 eggs (yolks separated from whites)
1 tbsp. vanilla extract

Preheat your oven to 350 degrees.  Mix all of the dry ingredients (except the sugar) in a bowl.  In a two separate bowls, separate the egg yolks from the whites.  Once the eggs are separated, begin beating the egg whites until stiff peaks form.  Set the egg whites aside for now.  The next thing you'll do is blend the egg yolks, sugar, vanilla and butter.  The color of the mixture should lighten considerably.  I'd say from the color of the egg yolks to a very pale yellow. This should take about 3 to 4 minutes of mixing on high speed.  Make sure to stop and scrape the sides of the bowl if you're using  a hand mixer.  Next begin adding the flour to the mixture in thirds. After the flour is well incorporated, begin folding in the egg whites.  Add the batter to a greased baking pan and bake for 35-40 minutes or until you prick the center and the toothpick comes out clean.  This will yield a very spongy cake- perfect for the absorption of the milks.  Remove the cake from the oven and allow it to cool completely before going to the next step.  I put it on a dish with a lip so that the milk mixture didn't spill over.


For the milk combo:
2 cans evaporated milk
1 can condensed milk
1 cup half and half (the real recipe calls for heavy cream, but i just couldn't do it!)

In a bowl or large measuring cup, combine the three milks above.  I used a whisk to dissolve the condensed milk well.   Now you'll take your cake and using a fork begin to prick it all over.  This will create little holes for the milk to seep into.  Begin to slowly pour the milk over the cake.  Making sure to get the edges. After you've used up all of the milk mixture, transfer the cake to fridge to continue to cool.

For the topping:
1 cup whipping cream
1/4 cup superfine or powdered sugar

On high speed, blend the cream and sugar until you have a nice and thick whipped cream topping to spread over the cake.  Top with maraschino cherries, strawberries or eat it alone.  Enjoy!

Wednesday, September 1, 2010

Tostones


As you may have seen in my previous post, there were other things on the plate besides black beans.  One of the sides is called "Tostones".  They're made with green (un-ripe) plantains.  There's another kind of plantain which is sweet and sticky and delicious too- and that's made with the same plantain, just when it's really ripe. Tostones are crunchy, slightly salty and the perfect accompaniment to any meal or alone as an appetizer.  I rarely fry food, but every once in a while, I'll give in and usually it's to make these.

For the Tostones:
2 green plantains (buy them as green as you can find them)
unflavored coconut oil for frying or other neutral tasting oil
salt to taste

First cut the plantain into about 1/2" thick segments and remove the peel around the outside.  Add the oil to a frying pan and turn the heat up to medium high.  Once the oil is hot, add the pieces of plantain and fry until the first side is golden.  Flip each piece and allow for it to cook on the other side.  Next remove the pieces of plantain from the oil and set them on a plate or flat surface.  To form the disks you will need something flat to smoosh the pieces down until you have a flat, thin, disc.  Add the discs back into the oil and fry until both sides are golden brown and crunchy.  Remove from the oil, season with salt and serve.   You can serve this with mojo sauce if you're serving as an appetizer.  Enjoy!

For the mojo sauce:
2 limes (juice only)
4 large garlic cloves
1/3 cup light olive oil
pinch of salt

Grate the garlic and add to a bowl.  Squeeze the lime juice into the bowl and add the oil.  Using a whisk, blend vigorously until it's slightly emulsified.  Make sure to stir before spooning over your food.

Tuesday, August 31, 2010

Authetic Cuban Black Beans


I have posted a shortcut version to Cuban black beans here before, but I thought I'd also post the real way my mom and grandma have made black beans for years.  Let me just state that black beans are one of, if not the most important or common dishes in Cuban cuisine. We serve them over rice, eat them alone, cook them into the rice to make "moros"- another typical Cuban side dish.   Black beans are served from parties to weekday dinners, and are always a welcomed addition to any meal.  There are tons of recipes for black beans, but I tend to be a bit of a purist when it comes to the ingredient list.  I think the flavor of the beans when you're not using the canned variety really lends a totally different taste that doesn't need much "help" as opposed to the doctored up version I've posted here before.  Some people add vinegar, or bay leaves or even olives which I add to my shortcut version, but for my family's traditional recipe I omit all three. In the picture above there is a really typical side dish called "tostones" which is made with green plantains.  I will post that recipe next.

Ingredients:
1 package dried black beans
water (for soaking the beans and later cooking them)
2 onions
2 green peppers
1 red pepper
5 garlic cloves
3 tbsp olive oil
salt to taste

The first thing you do is open the package of beans and dump it into a fine meshed sieve to rinse them, and remove any little particles like twigs or rocks.  Then put the beans into a bowl and cover with water.  Let the beans soak for about 2 hours.  If you're not using a pressure cooker, you'll have to let the beans soak overnight.  I used a pressure cooker and it cut my cooking time dramatically.   Once you're ready to cook the beans, add them to the pot along with the water they were soaking in. Make sure that you have enough water in the pot to cover the beans and come up about 2 inches from the beans.  Next remove the outer layer of an onion and cut it in half.  Add that to the pot along with one green pepper (seeds removed) and 2 cloves of garlic.  Place the lid on the pressure cooker an cook until the beans are soft and tender- about 30 minutes in the pressure cooker or 2 hours in a regular pot.  Once the beans are tender, remove the onion, pepper and garlic and take some of the liquid from the beans and add to a blender. Add 2 raw garlic cloves to the blender and whizz it around until you have a smooth puree. Add it back to the pot with the beans. This would be a good time to add salt to the beans.


Now we begin to build the aromatics for the beans.  A trick my mom showed me was to add a roasted green pepper.  The way to do this is by simply putting the pepper on the burner and allowing it to roast.  Really, it's more like a char, but you get the idea.  You can also broil them like the Pioneer Woman does. Once you have a nice char throughout, cut the pepper in half and put it in a zip lock bag.  The steaming action that forms in there will make it much easier to peel the skin.  After about 15 minutes, remove the black skin to reveal the smooth layer underneath, and add the pepper to the pot.


Next dice up the other onion, red pepper and green pepper and saute olive oil until nice and tender.   Add this to the blender taking a little more liquid from the beans and adding the remaining garlic cloves and pureeing. Add the puree back into the pot with the beans and stir to combine everything really well.  Taste to make sure it's seasoned to your taste and allow for the liquid to thicken up by simmering lightly for about 20 minutes uncovered.  Drizzle a little extra virgin olive oil over the top before serving.

Monday, August 2, 2010

Chop Chop


One of my favorite fast food restaurants in Miami is Chicken Kitchen.  It's really not fast food, more along the lines of a Chipotle of sorts, but with a different menu.  For those of you who've never had it, it' Caribbean marinated chicken that's grilled.  Then the skin is removed and this guy with two cleavers chops it up into little pieces.  Then it's served on top of a bed of yellow rice. You then mix it with your choice of sauce.  There are about 8 or 9 different sauces, but my favorites are the Cilantro-lime sauce, the mustard-curry sauce, and the sweet and sour sauce.  At least that's how the original one started years ago. Now there are all kinds of versions to the original chop chop, like the Cuban Chop, the South of the Border Chop, etc.  Check out their menu.  I tried to re-create my beloved Chop Chop since its one of the places I miss the most now that I don't live in Miami.  Below is my attempt.

For the Yellow Rice:
2 cups white rice (I think they use parboiled)
2 & 1/3 cups chicken stock
1 tbsp butter
1 cup chopped onion
1 tsp. salt
2 tsp. bijol or annatto powder

Finely chop up the onion and saute in the butter.  Make sure to do this in a pot that has a lid for steaming the rice later.  Next wash the rice to remove the excess starch. Drain of all the water and add to the pot with the onions.  Saute for a little will, stirring occasionally to lightly toast the rice evenly, but it should not be brown or change color at all.  Next add the chicken stock, salt and annatto powder.  Stir well and allow for the rice to cook on high until the liquid is about half evaporated.  At this point, bring the heat to low and cover with a lid. Cook for about 15 minutes covered.  Fluff with a fork.

For the Chicken:
2 chicken breasts (with skin and bones)
5 garlic cloves
1 tsp. dried oregano
1 lime (juice)
garlic powder
2 tbsp olive oil
salt- enough to sprinkle over each piece of chicken

Marinate the chicken at least four hours in advance, but it's even better if you do it overnight.  Grate the garlic into a bowl, add the olive oil, oregano and lime juice and blend well.  Add the chicken to a plastic zip-lock bag and add the marinade.  Massage it into the chicken well and put the bag in the fridge to do its magic.   When you're ready to cook the chicken, season with salt and grill (I like mine on the bbq so that it gets that grilled taste).  Allow the chicken to cook through undisturbed on either side for about 8-10 minutes.  Let the chicken rest before cutting it.  Remove the skin and chop it into little pieces.

For the Cilantro, Garlic and Lime Sauce:
1/2 cup light mayo
3 tbsp. water
1 tsp light soy sauce
2 garlic cloves
1 lime (juice)
1/2 cup fresh cilantro

Wash the cilantro and remove the stems.  Add the mayo, water, lime juice and soy sauce to a blender and combine.  Next roughly chop the garlic and add it to the blender along with the cilantro.  Blend until you have a light green colored sauce and no large chunks of cilantro or garlic are present.  Drizzle over your Chop Chop and enjoy!

Tuesday, July 27, 2010

Meatless Monday…Char-grilled Veggies and Black Beans


I am not vegan, although we did try that a few years ago and did it for about 6 months.  Every now and then its nice to eat a meal with no meat, or cheese or animal products.  Last night's menu consisted of grilled eggplant, grilled zucchini, grilled onions, Cuban black beans, white rice, and garlic lime Mojo sauce.   I am a fan of Michael Pollan and his Mantra: " Eat food. Not too much. Mostly Plants".  I have not enjoyed a meal as much as this one in a long time.  It really was very very basic.  The veggies were grilled only sprinkled with Himalayan salt.  I could have eaten the grilled onions alone as a meal... I couldn't believe how much flavor the veggies had without really anything added except salt. I will be making this meal again very soon.

For the veggies:
1 Japanese eggplant
1 large zucchini
2 large onions
salt to taste

Take the eggplant and slice into three sections. Begin slicing lengthwise to create planks- about 1/4" thick.  Slice the zucchini into 1/4" rounds.  Lastly slice the onion removing the outer tough skin.  Make sure to slice the onion into rounds without separating them.  You should have discs of onions that are still intact.  Take a grill pan and put it on the stove, setting the heat to high. Do not add oil or anything. If you absolutely have to, spray a little PAM, but really it's not necessary.  Lay the pieces of eggplant on the pan and allow for them to cook until you get nice grill marks. Season the top side of the eggplant with a little salt. Flip and cook on the other side until you get grill marks on each side. Remove from the pan and do the same thing the zucchini and onions.  It's important that you let the veggies cook undisturbed.  If you start flipping them around too much then the veggies will stick and not caramelize like it's supposed to.

I served this with doctored up Cuban style black beans.  Because this was a veggie heavy meal, I really bumped up the onions and peppers I added to the dish. I've posted this recipe before but for convenience's sake, here it is again.

For the doctored up Cuban style black beans:
2 cans black beans
1/3 cup water
1 tsp. vinegar
2 bay leaves
1/3 cup finely diced green pepper
1/3 cup finely diced red pepper
1 large onion finely diced
4 large clove of garlic
3 tsp. extra virgin olive oil
salt to taste

Finely dice the peppers, onion and garlic and sauté with olive oil in a pot. Once this mix has become tender, add the cans of black beans and water. Add the bay leaves and vinegar, allowing the beans to simmer over med-low heat for 20 minutes. Remove the bay leaves before serving.

In Cuban cuisine, mojo sauce (pronounced Mo-ho) is a staple.  It's used to pour over yuca, as a condiment or to marinate meats.  I drizzled a little of this over the veggies and added to the beans for extra umph.

For the mojo sauce:
2 limes (juice only)
4 large garlic cloves
1/3 cup  light olive oil
pinch of salt

Grate the garlic and add to a bowl.  Squeeze the lime juice into the bowl and add the oil.  Using a whisk, blend vigorously until it's slightly emulsified.  Make sure to stir before spooning over your food.

Thursday, February 11, 2010

Fufú de Plátano


Fufú de Plátano is a Cuban dish that isn't as popular as some of the other dishes I've posted.  When I was little, my grandma would make this, and boy was it an event.  Everyone would come over to eat it, since it was only made once in a while.  The recipe varies quite a bit but my grandma made hers with crackling pork rinds. Since I follow kosher laws, I had to find a substitute- which 9 times of of 10 ends up being turkey bacon.

3 large semi-ripe plantains (they should be pale yellow with few brown streaks and somewhat pliable to the to the touch but not soft or mushy)
3 garlic cloves
4 tbsp. butter
1 cup cooked turkey bacon (chopped into little pieces and fried till crispy)
salt to taste

First peel the plantains and cut them into sections.  Boil them until they're fork tender.  While the plantains are boiling, dice the bacon and saute in a non-stick pan until they're nice and crispy- transfer to a plate.  Using a knife, smash the garlic cloves and add to the pan with the butter.  Allow the garlic to saute for a bit to infuse the butter, removing the pieces once they're cooked. Mince the garlic and toss back into the pan.  Once the plantains are cooked, drain well and transfer to the pan with the butter.  Take a potato masher or fork and begin mashing the plantains, adding a little water if the mixture is too dry- but go easy on the water, this dish should be chunky with imperfect pieces.  Once the plantains are mashed, add in the bacon and combine well.   Season with salt as needed.

Friday, February 5, 2010

Chicken Ropa Vieja and Mangu


We had an awesome dinner Wednesday night.  It was perfect too... it's been raining and super cold in the Dallas/Ft, Worth area for what seems to be 3 months straight.  There is a Cuban dish called Ropa Vieja (pronounced Rope-Ah Vee- ae- ha) which translates to "old clothes".  Ropa vieja is usually made with flank steak that is cooked till fork tender. Usually in a pressure cooker and then shredded.  This time around I used chicken breasts and it was just as good.  I was thrilled to see that although green plantains are considered a carbohydrate, it's somewhat low on the glycemic index so in my book, that means we can eat them every so often.  My guess is that they're loaded with fiber so that's why they're digested more slowly, causing less of a spike in glucose levels..   I didn't want to fry them as they're usually prepared in Cuban cuisine.  So I called up my Dominican friend, Gaudy, and asked her how to make Mangu.  Mangu is a dish made of mashed green plantains that is delicious.


For the Chicken Ropa Vieja:
4 chicken breasts (boneless, skinless) (boiled and shredded)
1 small yellow onion
1 small red bell pepper
1 small green bell pepper
1 small yellow bell pepper ( I usually don't add this, but I had one left that I didn't want to let spoil)
4 garlic cloves
1 bay leaf
2 cans tomato sauce
1/4 cup dry white wine
2 tbsp. olive oil
1 tsp. cumin
1/2 lime, juiced
1 tbsp. ketchup
1 tsp. garlic powder
salt and pepper to taste

Boil and shred the chicken breasts.  If you need something to do while the chicken is cooking, begin slicing your onions into half-rounds.  Really you can cut it up however you like, but I like strips for this dish.  Same thing goes for the peppers.  Slice them up in strips.  Mince or grate your garlic cloves and set aside.  In a non-stick pan, preferably something with a little depth to hold all the ingredients to come, add the olive oil and turn the heat on to med. high. Add the onions, peppers and garlic and allow for them to cook until tender.  Stirring occasionally.  Add the chicken to the pot and combine with the veggies.  Next add the bay leaf, garlic powder, tomato sauce, white wine, cumin, lime juice, ketchup, salt, and pepper and mix well.  It should be quite wet or moist, if not add a little more liquid- chicken stock would work or even a little water.  Turn the heat down to med. low and allow for the chicken to simmer int he sauce for about 20 minutes.

For the Mangu:
3 large green plantains
5 tbsp. butter
1/3 cup water
a pinch of garlic powder
salt to taste

Now, let me start by saying that I didn't exactly follow Gaudy's steps exactly because I was kind of lazy and I figured the chicken had lots of onions so I didn't want it to be over kill.  But she did recommend that  I add one sauteed onion to the mashed plantains.  She also said the traditional Mangu did not have garlic, but I couldn't help myself.  I just added a little garlic powder.

Any who the first thing you do is remove the skin off the plantains and cut into sections.  Add water to a pot and season with salt. Put it on the stove and once the water is boiling, add the plantains.  Cook the plantains until for tender.  Once cooked, drain and place in a mixing bowl.  With a potato masher, begin to mash the plantains adding the butter in little by little and blending.  If the mixture seems too dry, add a little water and continue blending.  Season with a little garlic powder and salt, and continue mashing till smooth.

Serve on a dish topped with the chicken, sprinkled with cheese.  Get ready for an awesome night's sleep.

Back to Top