Saturday, October 30, 2010

Croquetas


Croquetas originated from Spain and are often served as part of a tapas menu.  Although I never knew that, I always just assumed they were Cuban. Partially because they're available at every Cuban bakery in Miami.  They're the quintessential snack food that seemed to always be present at parties, get-togethers, and Sunday breakfasts.  My brother inspired this post.  He said it best with his twitter update of a few weeks ago. "Nothing cures a hang-over like a croqueta preparada". What is a croqueta preparada you say?  It's a sandwich made with Cuban bread (much like French bread, only not as crusty, more on the soft side) two croquetas, (ham and cheese- but I skip this part) and ketchup.  Some add onions or even lime juice. Wash that baby down with a JupiƱa and you'll be good to go till dinner time.  The most common variety of croquetas are the ones made of ham (I used turkey ham for these since I follow Kosher laws), but really any ground up protein will work.  When I was little, my family used to make croquetas out of the leftover turkey at thanksgiving.  The croqueta made of chicken are probably the next most common version.  I've seen them made of cod, spinach, all sorts of things- really the sky's the limit.  So go on... make one. You'll be glad you did.

Ingredients:
5 tbsp. butter
1 cup flour
1 1/2 cups whole milk
1/2 cup chicken stock
2 tbsp. dry white wine
1/3 cup onion very finely diced
2 cups ground up ham (I used turkey ham)
1 tsp. ground nutmeg
1 tsp. salt
canola oil for frying

For the breading:
2 eggs
2 cups plain bread crumbs


 First thing to do is add the butter to a non-stick pan.


Let it melt and then add the flour.  With a silicone whisk or spatula, begin combining the flour and butter.
Let it cook a little bit on medium heat so that the raw flour taste cooks out.  Finely dice your onion and toss it into the pan to cook with the flour and butter mixture.


Next add the milk and chicken stock and begin whisking vigorously to incorporate the flour well into the milk. Add the wine at this point. Make sure to dissolve any clumps- and turn the heat down to medium low.
Add the ground nutmeg and salt and combine well.  The sauce will thicken considerably.  But that's the way it's supposed to be for this  particular dish.


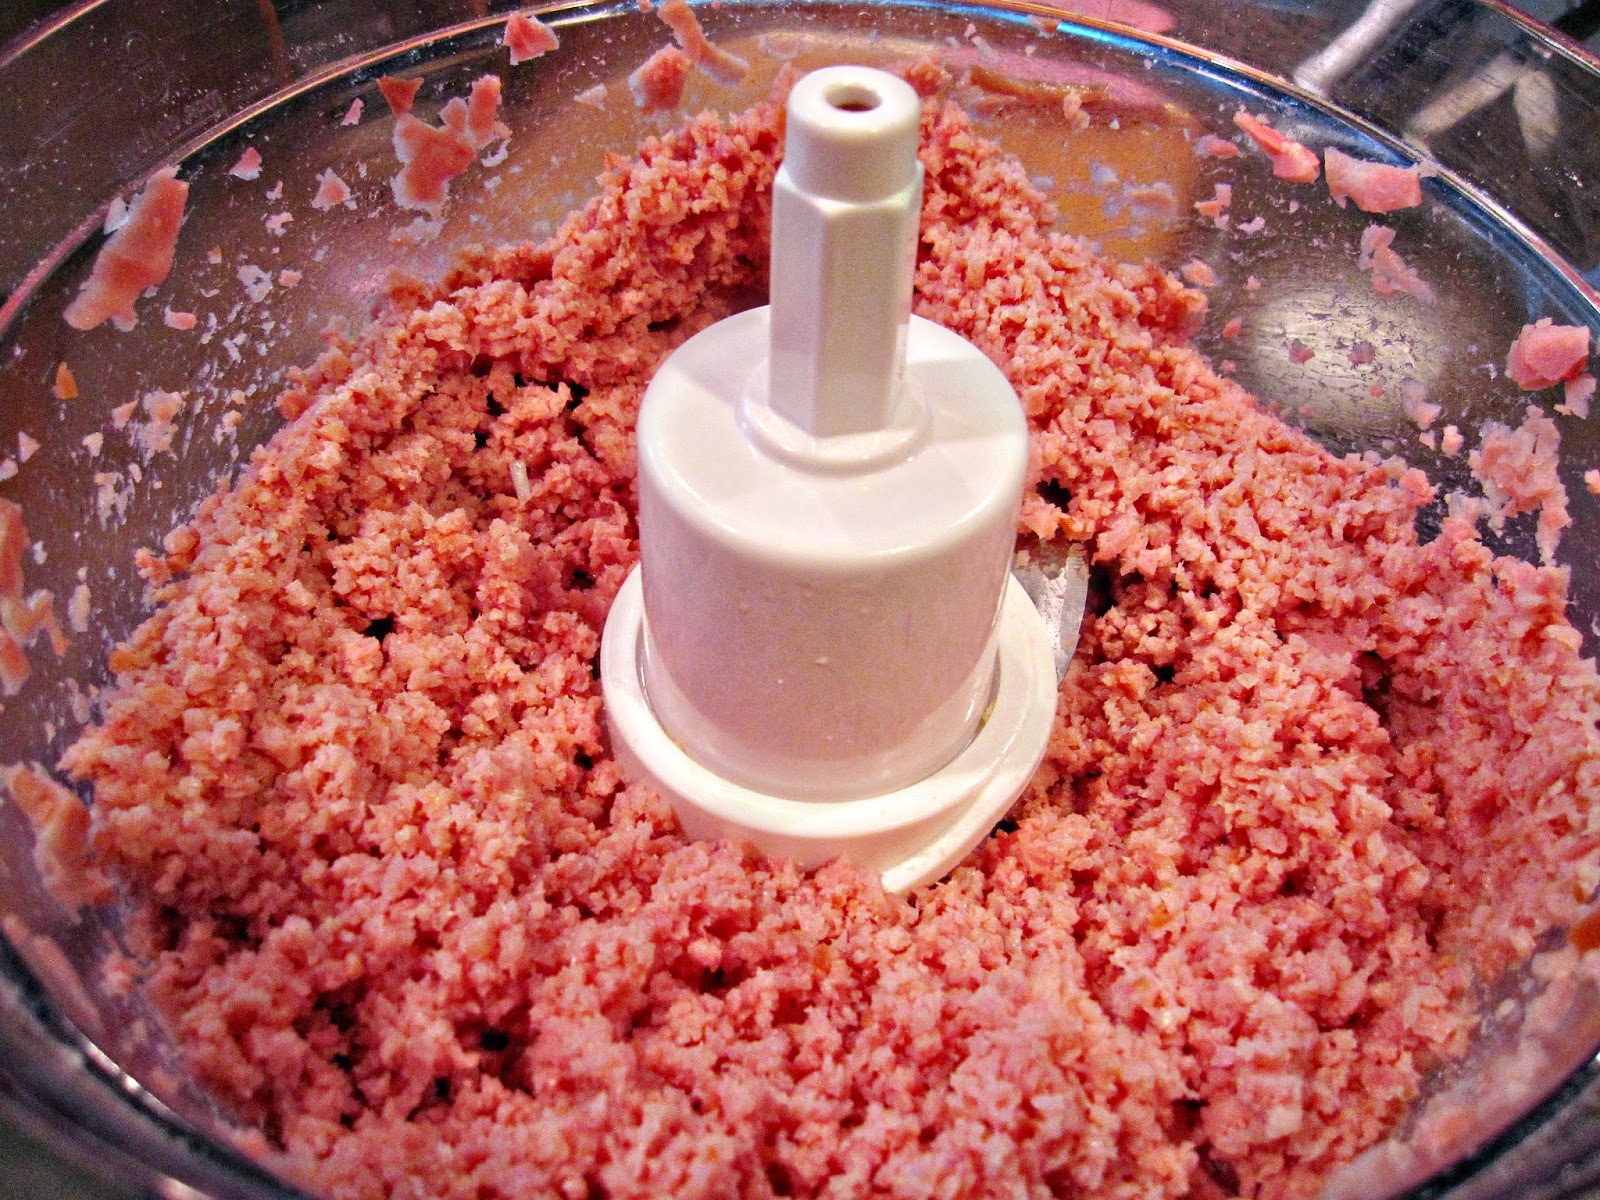
Turn the heat off at this point. Chop up the ham into cubes and toss into the food processor.  Run the processor for about 30 seconds.


Now add the ham to the bechamel sauce, making sure to incorporate well.Make sure you let this mixture cool completely before moving on to the breading.  I transferred this mixture to a pan and put it in the fridge for about 30 minutes.


Once you can touch the mixture without burning yourself, begin forming the croquetas and then passing them through the egg and bread crumb mix.  You'll want to repeat the process twice for each croqueta.  Transfer to a plate and let them just hang out there.


 Put the canola oil into a non-stick pan and turn the heat up to medium.  Once the oil is hot, transfer the croquetas to the pan.  Making sure to turn them on every side to make sure you get a nice even golden color throughout.


Serve with some ketchup.  If you've had a long night and want a "stick to your ribs" meal, slap two croquetas in between some Cuban or French bread, squeeze some ketchup and enjoy the "croqueta preparada".


Thursday, October 28, 2010

Chicken Parmesan: You'll Never Know it Wasn't Fried


 I'd like to start by saying that I love Chicken Parmesan.  But I hate frying food.  I also hate feeling guilty after I eat a meal.  I modified the traditional recipe by baking the chicken instead of frying. Also, instead of covering the chicken with a ton of cheese, I simply put a small slice of buffalo mozzarella over each piece.  Lastly, I made the sauce too instead of buying the bottled variety. Granted, I am not terribly opposed to bottled sauces(if they're of a good quality), but they're really overpriced sometimes, and making your own is simple- not to mention, delicious and YOU control what's going into them.

 For the chicken:
4 Boneless skinless chicken breasts
2 eggs
1 cup flour
2 cups panko bread crumbs
1 -2 tsp. salt
mister with neutral flavored oil (like canola) or butter flavor cooking spray
4  1/4" slices fresh buffalo mozzarella
1 tbsp fresh chopped basil for garnish


For the sauce:
1 onion (very finely diced)
6 cloves garlic, minced
1 28 oz. can crushed tomatoes
1 15 oz. can tomato sauce
4 tbsp. olive oil
1 tbsp. fresh basil (chopped)
1/4 tsp. dried oregano
1/4 tsp. dried nutmeg (I know it sounds weird but it works- trust me)
2 tbsp. ketchup
1 cup whole cherry tomatoes

The first thing to do is pre-heat your oven to 400 degrees.  For this particular recipe, I decided not to butterfly the chicken breasts because I thought they'd be too thin.  Instead, I placed the chicken breast on a cutting board (I use one of those thin overlays just for meat) and placed a piece of plastic wrap over the top. Gently pound out the breast until you have a pretty even piece.  Repeat until you've done this to the four pieces.  Season each piece of chicken with salt.  Now we're ready to create the breading station.  In three separate pans, add the flour, bread crumbs, and beaten egg.  Before diving into the breading process, have your baking sheet ready to go.  For this particular dish, I lined my cookie sheet with a silicone mat- if you don't have a silicone mat, then use parchment paper.  This step is important because, although most cookie sheets are non-stick, the breading tends to stick anyways.  Using parchment or a silicone mat will prevent this from happening this is also true since we're not using a ton of oil or butter for the baking.  Begin breading the chicken by dredging the chicken into the flour, then the egg, then the panko bread crumbs.  I used to think the flour part was unnecessary until I tried it.  This step really helps the crumbs adhere to the chicken, creating a nice even crust.  Transfer the chicken to the baking sheet.  Now spray each chicken on both sides with the cooking spray or the oil mister.  Make sure you have a fair amount before putting the chicken in the oven.  Bake for about 8 minutes on each side.  Flipping the breasts, once to make sure all the sides are crunchy.

While the chicken cooks, let’s begin making the sauce.  Begin dicing your onion and garlic into the smallest pieces possible.  Add the olive oil to a pan and turn up the heat to medium high.  Add the onions and garlic and let them cook for about 5 minutes.  Next open the cans of crush tomatoes, and the tomato sauce and transfer to the pan. Add the ketchup next, stirring the sauce to blend everything well.  Now let’s start adding the seasonings: nutmeg, salt, oregano, and chopped up basil. Add the cherry tomatoes. Stir again and let the sauce simmer on low heat until the chicken is done.

Remove the chicken from the oven and ladle the sauce over each piece.  Top with the slice of buffalo mozzarella and bake for another five minutes.

Garnish with some freshly chopped basil.  I served this with grilled zucchini that was simply seasoned with sea salt and lots of freshly cracked pepper- grilled in a little olive oil.

P.S. - Just look at how beautiful those little cherry tomatoes look in the sauce... aren't they cute?

Tuesday, October 26, 2010

Caprese Salad


This salad is delicious and so straightforward.  Just a few basic ingredients and you have the most stunning dish!

Ingredients:
2 ripe tomatoes
8 slices fresh buffalo mozzarella
8 large basil leaves (fresh)
2 tbsp. extra virgin olive oil
1 tbsp. balsamic vinegar
salt and pepper to taste

First you slice your tomatoes in slices about 1/4 inch.  One tomato should yield 4 nice slices.  Arrange 8 slices of tomatoes on the bottom of your platter and season with salt and pepper.  Next slice the mozzarella into 1/4" thick slices and place one slice over the bottom layer of tomatoes.  Place one nice big piece of fresh basil over each piece of cheese.  Top the cheese and basil with the other slice of tomato.  Drizzle a little olive oil and the balsamic vinegar over the salad.  Lastly, season with fresh cracked pepper and salt.

Side note: You want to make sure that the tomatoes you pick for this salad are really ripe- they should be a deep red and really juicy.  The dish just won't be the same with mealy tasteless tomatoes.  Even if it means paying a little more for a better looking variety- go for it.  Besides, buffalo mozzarella isn't cheap so you need a flavorful juicy tomato to stand up it.

Monday, October 25, 2010

Last Night's Dinner and an Attempt at Slowing Down


It's been kind of a crazy two weeks, and I realized, I need to slow down and just enjoy the moment. Things at work are crazy since our department is hosting its huge annual event and I've been trying to hire someone to do some work on my blog design- to no avail.  Suffice it to say that I've been such a spaz, that I left my purse in the child seat of a grocery cart went I went to the Asian market on Thursday.  I didn't notice my purse was missing until Friday morning when I needed to go to work and couldn't find it. Thank God that when I went to the Asian market on Friday morning, someone had found the purse and turned it in- untouched.  Not a single thing was stolen.  I was overcome with sentiment and started crying in front of the store manager who kept saying in the funniest Asian accent "you a lucky woman" over and over.

This little incident made me realize that I need to pour myself a nice glass of wine and just enjoy the present without worrying about the future and everything I have to do.  My mind has been going a million miles an hour all day everyday it seems.  In order to quiet my mind, I turned to what I do best.  Cook. Cooking is therapy.  Certainly eating doesn't fall short either.  There's something therapeutic about chopping vegetables, enjoying the smell of food wafting through the house, serving a simple, but delicious meal and enjoying it with the best friend a girl could have.

I will be posting the recipes from last night's meal throughout the week, but this was the menu:

Caprese Salad
Baked chicken Parmesan with buffalo mozzarella, fresh pasta sauce and cherry tomatoes and grilled zucchini
Rosemary olive oil bread

That was the menu... but to top it off, I sliced up some lemons and served myself a tall glass of Perrier.... only the finest- lol...

Thursday, October 21, 2010

Pulpeta: The Cuban Meatloaf


Growing up, this dish was not made too frequently because my brother, Ozzy, was a really picky eater.  Unfortunately, this meant my mom would not make dishes that he didn't like too often.  This was one of those dishes.  Now, he's grown up and his palette has changed thankfully.  One day I was making this for dinner and he showed up.  He raised the lid of the pot and said "Oh you're making Brain for dinner"  He calls this dish "brain" because the center is stuffed with cheese and as the meatloaf cooks in the sauce the cheese oozes out. Don't let that bizarre introduction turn you off.  This dish is absolutely delicious- and it's one of those more obscure Cuban dishes that is definitely worth sharing. I think it my duty to preserve these family recipes so that we can continue to pass them down throughout the generations. Oh yeah and did I mention that it's delicious?

Side note- This recipe calls for ground beef.  Lately I have been using the food processes to grind up my own meats.  It gives me a little peace of mind to know that there's no "mystery meat" or fillers in the meat I'm using.  I had no idea that the food processor could do this until recently and it's my new favorite kitchen trick.


Ingredients:
3 lbs. Ground Beef (I ground up my own, using brisket)
4 eggs (two for the meatloaf mixture, and two for the breading station)
2 cups plain breadcrumbs or cracker meal (1/2 cup for meatloaf mixture, and 1 1/2 cups for the breading station)
8 mozzarella string cheese sticks (four per loaf)
2 large onions
1 green pepper
6 cloves garlic
3 tbsp. extra virgin olive oil
1/2 cup canola oil
2 small cans tomato sauce
1 can petite diced tomatoes
2 tbsp. ketchup
2 1/2 cups dry white wine
1 tbsp. garlic powder
1 bay leaf
salt to taste

My first step was grinding up the beef in the food processor. You'll skip this step obviously if you're using beef that's already ground.  Another advantage to using the food processor is that after you're done grinding the meat, you can just add all of the seasoning and blend instead of having to use your hands and a separate bowl.  This is a shortcut, and it's the first time I've done it this way though.  I added the two eggs, salt, garlic powder, and 1/2 cup of bread crumbs to the food processor and blended everything.  If you're not using a food pro, then just mix everything in a bowl.  Next remove the beef mixture and transfer to a cutting board.  Press the meat down like if you're making a massive hamburger and then add four pieces of string cheese in the center of the patty.  Fold the sides and ends over to create a large loaf.   Make sure to seal the sides well so that the cheese doesn't all ooze out during the cooking process.  You will have some cook out, but that's just part of the beauty of this dish.  Who doesn't like cheese oozing out into sauce??


Next create the breading station for the loaves (as shown above). I made two,  loaves.  This is a great meal to keep for leftovers.  You can make pulpeta subs the next day if you want to change it up a bit- its sort of like a meatball sub. Ok, back to the pulpeta, begin breading the loaves.

Next, we'll brown the loaves.  Add the canola oil to a deep pot with a lid- preferably non-stick. Make sure to turn the loaf on all sides to brown evenly.

Transfer the loaves to a cutting board for now so that we can begin on the sauce.

Discard the canola oil we used to brown the pulpeta.  Add the olive oil to the pan and turn up to medium heat.  Begin chopping the onion, green pepper and garlic and add to the pan to begin sauteing.

Allow the onions, peppers and garlic to cook for about 10 minutes. Next add the tomato sauce, diced tomatoes, ketchup, wine and bay leaf.  I know ketchup sounds weird huh? But I find that whenever I make any tomato based stew or sauce adding a little ketchup balances out the flavors and adds a really slight sweet touch to the sauce.

Allow the sauce to simmer for about 5 minutes before putting the loaves back into the pan.

Cover with a lid and allow the pulpeta to cook for about 40 minutes on medium low heat. When you remove that lid you'll find that the sauce has thickened beautifully, the cheese has begun to  ooze.  This is a thing of beauty my friends... you'll just have to trust me on this.

The next thing you'll do is ever so gently, remove one of the loaves to a cutting board and cut into slices.  Then transfer the pulpeta back into the pan so it doesn't dry out.

Serve a slice with lots of yummy sauce and white rice.

Monday, October 18, 2010

How to Make Perfectly Cooked White Rice


I know this post might sound boring.  But several people have asked me what the secret to perfectly cooked white rice is. Many people have told me that when they follow the directions on the package, the rice comes out sticky or too wet.   I am going to tell you exactly how to make perfectly cooked white rice in a step-by-step instructional post.  Say goodbye to sticky and goopy and say hello to perfectly light and fluffy rice you'll be proud to serve.

Just a side note- different varieties of rice call for different amounts of water.  For example, brown rice calls for exactly double the amount of water.  Jasmine rice has a much higher starch content it seems, and requires less water- I usually add exactly the amount of water as rice and add about 1/4 cup of water extra.

Ingredients:
2 cups long grain white rice (or however much rice you're making, this is just how much I made for this post)
2 1/3 cup water
1 tbsp. canola or other neutrally flavored oil
1 cap-full white vinegar
1 tsp. salt

The first thing you should do is measure the rice.  I measured 2 cups and then transferred it colander with fine holes.

Next wash the rice thoroughly until the water runs clear.  Let me just stress the importance of this step.  Rice is high in starch, and washing the rice out well will remove the excess starch that is one of the causes to gummy rice.  Make sure you get in there and stir the rice around, washing until the water runs clear.  I know I said it twice, but it bears repeating! Ok drain the rice well, shaking the colander to remove all of the excess water.

Next add the oil to your pot and turn on to high heat.  Quickly after transfer the rice and stir around to coat the grains.

Begin stirring the rice around to toast the rice slightly.  The rice should appear shiny at this point.  Now we're ready to add the salt water and vinegar. You won't even taste the vinegar, but it's a little trick to remove the stickiness of the rice. Make sure the heat is set all the way up to high.  Allow the water to come to a boil and let it cook until about half of the water has evaporated.

Once the water is about half way evaporated, cover the pot with a lid and turn the heat down to low.

After about 15 minutes turn off the heat.  Leave the pot alone without removing the lid for another 5-10 minutes.  Fluff with a fork and serve.

Saturday, October 16, 2010

Pumpkin Cake with Cream Cheese Frosting


As I mentioned in my previous post,  I love pumpkin.  Pumpkin lattes, pumpkin ravioli, pumpkin pie... you get the idea.  I also love this roasted pumpkin cake and I think you will too! I knew it was going to be  a winner too because I tasted the batter and even that was great.  I think the dark brown sugar and cinnamon combined with the pumpkin really blend well. It was super easy to make too.  It took me about 15 minutes only to prep.  This cake is best served with a cold glass of any milk you like.  I personally like rice milk but any will work well.  Enjoy!

For the cake:
2 cups roasted pumpkin puree
4 cups flour, unbleached
2  cups dark brown sugar
1 1/2 tsp. baking powder
3 tbsp. ground cinnamon
1 tsp. grated nutmeg
2 tsp. salt
4 eggs
1 1/2 stick butter (melted)
1 tsp. pure vanilla extract

The first thing to do is roast the pumpkin in a 400 degree oven for about 30 minutes.  I used about 1/2 of a medium sized pumpkin that already came cut.  Once it's roasted, remove the seeds. Scoop out the flesh of the pumpkin and transfer to a food processor.  Blend on high speed until you have a smooth puree.  Make sure the puree is cooled before proceeding to the next step.

Make sure the oven is set to 375 degrees. Next add the butter, eggs, pumpkin puree, sugar and vanilla and blend on medium speed with a mixer. In a separate bowl, combine the flour, baking powder, salt, cinnamon and nutmeg.  Add to the wet batter in thirds, mixing well each time.  Add the mixture to a 13x9 baking pan that has been greased.  Bake for 45 minutes. Remove from the oven and transfer to a cooling rack.  Allow the cake to cool completely before frosting.

For the Cream Cheese Frosting:
1 stick butter, softened
1 1/2 bars of cream cheese softened
4 cups confectioner's sugar
1 tbsp. freshly squeezed lemon juice
1 tsp. vanilla extract
1 pinch of salt -to balance out the sweetness

While the cake is baking,  let's make the frosting.  In a mixing bowl, combine the butter and cream cheese and blend well.  Add in the vanilla extract, salt and lemon juice and blend well.  Begin adding the powdered sugar one cup at a time  and begin mixing, scraping the sides and the bottom of the bowl to make sure everything is evenly blended.  Now go frost that cake!

Thursday, October 14, 2010

Stuffed Butternut Squash with Chicken Meatballs, Barley and Sage


I'm ready for fall.  I've been ready since August when it was 115 degrees all day, EVERY DAY.  It was miserable.  I'm ready for sweaters, I'm ready for golden leaves, I'm ready for cooler weather, but more than anything, you know what I'm most ready for???  Pumpkin and squash season.  Have I ever mentioned how much I love these vegetables?  Their gorgeous color, their smell, their mellow and buttery taste.  Oh I am so ready for fall and pumpkins and sweaters... and this dish is sure to start the season off with a bang!

Ingredients:
2 butternut squashes
1/2 cup pearl barley
4 cups chicken stock
1 onion
2 tbsp. extra virgin olive oil
4 chicken breasts
1 egg
3 tbsp. mayonnaise
2 tbsp. rubbed sage or poultry seasoning
1/4 cup plain breadcrumbs
4 cloves garlic
1 sprig rosemary (chopped)
1/4 cup fresh thyme (chopped)
1/2 cup fresh sage (chopped, and reserving some to garnish)
1/4 tsp. freshly grated nutmeg
1/2 cup Parmesan cheese (shredded)
salt to taste

The first thing to do is preheat your oven to 400 degrees.  Next using a large sharp knife, cut the butternut squashes in half, lengthwise.  Place them on a baking sheet face up and let them bake undisturbed for about 30 minutes.  Don't worry about removing the seeds, they come up easier after the squash is baked.

Remove the seeds with a spoon.  With a small paring knife, cut a rim around the squash leaving about 1/2 " of a squash rim. The idea is to remove the squash in rustic cubes. You'll want to keep the shell in tact because we'll be stuffing it later and baking. 


Next, it's time to cook the barley.  In a small pot, add 3 cups chicken stock and the barley.  Let it come to a boil, then turn down the heat and allow the barley to cook for about 45 minutes on a low simmer.  Please note, I did not use the instant barley. 
While the barley is cooking, begin making the chicken meatballs.  I discovered recently that using a food processor is a great way to grind up meat.  I personally love the idea of knowing exactly what is going into my ground products. No mystery meat here!  I added the whole chicken breasts to the food processor.  Next roughly chop up the garlic, rosemary, thyme and about 3 tbsp. of the fresh sage.  Also add about 1 tbsp. of rubbed sage or poultry seasoning and salt.  Then add the mayonnaise.  I know that sounds really weird right? But you'll have to trust me on this.  If you don't add it to the mixture, the meatballs will turn out really dry since we're using boneless, skinless chicken breasts.  

Turn the food processor on and let it run until you have a smooth consistency.  Remove the lid and add the egg and bread crumbs. Let the food processor run until all of the ingredients are blended well. Now we're ready to form the meatballs.  Make them on the small side- I think they work best in this dish.  Then place them on a baking dish and bake at 400 degrees for about 25 minutes or until golden brown.

While the meatballs are baking, begin sauteing the onion in a deep skillet adding the 2 tbsp. of olive oil.  Add 1 tbsp of rubbed sage and the grated nutmeg. While that's cooking,  drain the barley well and add to the pot with the onions.

Next goes the chunks of butternut squash, the chicken meatballs, and 1 cup of chicken stock and season with salt to your taste.  Remember that the chicken stock has salt in it so go easy on the salt.

Ok we're almost done! Remember the shells of the butternut squash we reserved? Ok, now it's time to put this mixture back into the shells.  Top each butternut squash with a little shredded Parmesan cheese and bake in the oven until the cheese melts.  Garnish with roughly chopped fresh sage.


Sunday, October 10, 2010

Grilled Rueben Sandwiches


I served this with kettle cooked (reduced fat) chips, dill pickle slices and grilled onions and mushrooms.  This was a satisfying meal that took me about 15 minutes to make.  Thank goodness for quick and easy meals every now and then huh?

Ingredients:
2 Slices rye bread
1/4 lb. sliced organic corned beef
1 1/2 slice Swiss cheese
1/3 cup sauerkraut (drained well of liquid)
2 tbsp. 1000 island dressing
1 tbsp butter (to spread on the outer pieces of bread)

Assemble the sandwich by laying down the cheese, then the sauerkraut, then the sauce, and then the cheese.  Spread softened butter on either side of the outer sides of the bread and transfer to a grill pan which has been turned on to medium-low heat.  Allow the sandwich to toast, applying a little pressure with your spatula to flatten the sandwich down a bit.  Flip when the first side is golden brown.

Variations:
I personally like my Reuben better with French dressing as opposed to 1000 island or Russian dressing which is impossible to find apparently.   I also much prefer not using rye bread but for the sake of keeping the recipe with some semblance of the real thing, I kept the rye bread.


Back from the Gorgeous Countryside of Kentucky…


Every fall we celebrate a series of Holy Days called "The Feast of Tabernacles".  We refer to it as simply "The Feast" for short.  Every year we travel somewhere for the Feast and this year was no different.  The site was held in a little town in about 2 hours south of Lexington and it was absolutely gorgeous.  I had no idea Kentucky was so beautiful.  The place we stayed at was surrounded by lush green rolling hills, haystacks and lakes... a perfect and picturesque scene for what this time pictures for us.  We did so many fun things, but above all, it was a great opportunity to visit with people we hadn't seen in quite some time, as well as make new and lasting friendships.  This vacation was jammed packed with activities.

We started our trip with a visit to a local apple orchard.  We were not disappointed, especially since the first place you walk through when you arrive, is the bakery where the smells of apple pie, caramel apples, and fresh pressed cider circled the air.  We knew it was going to be a great outing.  We then paid for our collecting bags and went out to the orchard.  They told us we could taste any apple we liked. And let me just say... taste we did! The country store attached to the orchard was so quaint and lovely.  There we found all kinds of farm fresh products like locally grown honey as well as every kind of jam possible. We bought some pumpkin jam and had I known how great it was, I would have stocked up for the rest of the year!  We exited the orchard, but not before buying a half gallon of cider and an individual fried apple pie for each of us.


We got a group together and went horseback riding one of the days. We stopped at this gorgeous state park right by the riding stables.  The views were so beautiful.  After that, we set of to the stables.  I'll admit, I was so scared at first.  But I felt a ton better knowing my new friend, Erica, was in front of me.

One of the evenings, we hosted a sock-hop.  In a ton of pictures I'm in the background getting down.  It's also hard to miss me since I'm wearing a sweater with large green and white stripes.  It's almost like playing "where's Waldo" when I see these pictures. The evening was a blast and there were several games we played like the freeze dance and the Senior's twist that were such fun.  We played lots of oldies that everyone knows like Please Mr. Postman, The Lion Sleeps tonight, Rock Around the Clock etc.  My only complaint is that my feet were so sore the next day from dancing all night!


We also visited the prettiest state park and went horseback riding.

Last but not least, we hosted a Caribbean dinner for everyone.  Originally I thought there was too much food, but boy was I wrong...  it was well attended and we had a a great time getting to know everyone.  For those of you who asked me for some recipes, I will link them here.. I made Picadillo- a Cuban ground beef hash. I also made Ropa Vieja which is a shredded beef dish, but I made it with chicken instead (in the recipe I linked it to, it's served with mashed green plantains, but I served it with white rice at our Caribbean night). Several people asked me for the trick to making white rice that isn't sticky or soft.  I will do a separate post for that soon with step by step instructions.  For now I'll leave you with pictures of our Caribbean night.  I want to thank everyone of making this the best Feast ever!


Back to Top